
River Point Technology (RPT), an award-winning cloud consulting, training, and enablement provider, is thrilled to announce that we have been named HashiCorp’s Americas SI Partner of the Year for 2024. This prestigious recognition highlights our ongoing dedication to helping enterprises maximize their technology investments through HashiCorp’s suite of multi-cloud infrastructure automation tools. It also underscores RPT’s relentless commitment to empowering the Fortune 500 to redefine the art of the possible in cloud automation and management.
Sean Toomey, Senior Director, Partners, at HashiCorp, had this to say about the recognition, “River Point Technology has demonstrated a significant commitment to HashiCorp through substantial investments in sales, services, and training.”
He then added, “Notably, River Point Technology is distinguished as one of the few partners holding all three core competencies—Infrastructure, Security, and Networking. They also play a critical role in testing and piloting new products and features, reflecting their proactive involvement in innovation. Their expertise is especially vital in managing some of our most significant Strategic Accounts.”

River Point Technology founder and CEO, Jeff Eiben, highlighted the benefits of the relationship to organizations. “Our partnership with HashiCorp has allowed us to simplify infrastructure automation for our clients, enabling faster, more efficient deployment and scaling.” He went on to say, “Being recognized as the Americas SI Partner of the Year is a testament to our team’s expertise and our clients’ trust in us to deliver results.”
Expertise and Accomplishments
Indeed, the team is quite stacked when it comes to HashiCorp expertise. Beyond the competencies distinction, RPT can also boast more HashiCorp Ambassadors than any global partner including Core Contributors to the HashiCorp software. Recently, we earned the distinction of having the industry’s first and only experts to pass the challenging Terraform Professional Certification exam. Combined, these credentials ensure that our clients are in the hands of industry leading HashiCorp experts, fully equipped to guide them through their digital transformation journey.
Innovative Solutions for Enterprise Clients
To support RPT’s commitment to help clients succeed with HashiCorp products, we recently introduced RPT Bundles for Infrastructure and Security Lifecycle Management, that provide enterprises with tightly scoped, outcome-oriented services structured around HashiCorp Validated Designs (HVD). These bundles streamline the adoption, scaling, and operations of HashiCorp solutions.
River Point Technology’s exclusive Accelerator program offers ongoing enablement that help clients accelerate their automation journey. Our expert advisors are there to empower and lead your team through every phase of adoption; from discovery to build to process and ongoing adoption. For resource enablement we deliver custom, private training for HashiCorp products, ensuring that our clients have the knowledge and tools necessary to thrive.
Commitment to Excellence
RPT’s unique combination of best-in-class services, leveraging our HashiCorp Ambassadors and certified experts, positions us to continue delivering exceptional results for organizations across the globe. From our proprietary Value Creation Technology (VCT) process to custom integrations and advanced solutions, we empower enterprises to ‘think big, start small, and scale fast.’
As we congratulate our entire team on all their efforts that have helped us earn the prestigious HashiCorp Americas SI Partner of the Year award, we remain focused on delivering cutting-edge, human-centered solutions that empower our clients to achieve sustainable growth and success across their multi-cloud environments. We look forward to strengthening our relationship with HashiCorp further and proudly collaborate with other notable companies such as AWS, IBM, SUSE, Microsoft, Google Cloud, and more. This broad, technology-agnostic approach allows us to support our clients’ diverse digital transformation and cloud automation needs.
For more information, please contact our team today.


ABOUT BEN’S SESSION:
Cloud Engineering Track | Momentum Ballroom D
October 15, 2024 | 4:15 PM ET – 4:45 PM ET
Session detail: Kubernetes is a trendy solution, but in most cases, there is a skills gap when deploying and maintaining Kubernetes. I am looking at Nomad to bridge the gap and provide a simpler solution to run self-hosted platform infrastructure such as runners for CI/CD pipelines, Packer workflows to build image, send build metadata to HCP Packer, and lastly running HCP Terraform Agents.
Hashi Areas / technologies covered: Terraform, Nomad, HashiCorp Cloud Platform, Packer, Infrastructure Lifecycle Management
Scaling Simplified: How Nomad Bridges the Kubernetes Skills Gap
When it comes to orchestration, Kubernetes is often the go-to choice. Its popularity is undeniable, but many engineering teams quickly find themselves grappling with its complexity. Kubernetes’ steep learning curve and operational challenges have left many asking a crucial question: is there an easier way to scale infrastructure without compromising capability? The answer may lie in Nomad, a lightweight yet powerful alternative that’s steadily gaining traction for its simplicity and efficiency.
If you’ve ever found yourself struggling with the intricacies of Kubernetes or simply looking for a more straightforward solution to scale your infrastructure, then this upcoming session at HashiConf 2024 hosted by River Point Technology’s very own Ben Lykins, is for you. Titled “A Beginner’s Journey: Scaling Self-Hosted Platform Infrastructure with Nomad”, Ben’s session aims to provide the audience with actionable insights on how you can leverage Nomad to overcome the challenges often associated with Kubernetes.
Why Nomad? Understanding the Challenges with Kubernetes
Kubernetes is widely praised for its ability to manage containerized applications at scale, but the truth is, it often requires a significant amount of expertise to run efficiently. The inherent complexity can lead to several challenges, including:

- Steep Learning Curve: Kubernetes has a vast ecosystem that includes various moving parts such as Pods, Deployments, Services, Ingress, and more. For newcomers, this can be overwhelming and time-consuming to learn.
- Resource Intensity: Running Kubernetes clusters can be resource-heavy, particularly in smaller or self-hosted environments where cost and simplicity are critical.
- Operational Complexity: Maintaining and updating Kubernetes clusters involves careful planning and a deep understanding of how the different components interact with each other.
While Kubernetes is an excellent solution for many organizations, its complexity can lead to operational bottlenecks. This is where Nomad shines as an alternative—providing a simpler, more flexible platform for managing workloads.
What is Nomad?
HashiCorp Nomad is a flexible workload orchestrator that’s designed to run containers, VMs, and other application types on any infrastructure. Unlike Kubernetes, Nomad is lightweight and easy to adopt, yet powerful enough to handle production-grade workloads.
Here are a few key reasons why Nomad stands out as a strong contender for self-hosted platform infrastructure:
- Simplicity: Nomad’s core is lightweight, making it easier to install and manage than Kubernetes.
- Flexibility: While Kubernetes is designed specifically for containers, Nomad can orchestrate a variety of workloads, including containers, VMs, and batch jobs.
- Scalability: Nomad scales horizontally and can handle thousands of nodes without compromising performance.
- Integration with HashiCorp Tools: Nomad works seamlessly with other HashiCorp products such as Terraform, Consul, and Vault, creating an ecosystem that’s perfect for managing infrastructure as code (IaC).
How Nomad Bridges the Skills Gap
In this session, we’ll explore how Nomad addresses many of the pain points experienced by those who struggle with Kubernetes. Whether you’re new to infrastructure management or simply looking for a more efficient way to run self-hosted platforms, Nomad provides a simpler, more approachable solution. Here’s how:
1. Simple Configuration Language
Nomad’s use of HCL (HashiCorp Configuration Language) makes it incredibly simple to define and manage infrastructure. HCL’s human-readable syntax allows users to quickly and clearly define job specifications, configurations, and policies.
With Nomad, HCL streamlines workflows by offering a declarative approach, making it easy for both beginners and seasoned engineers to understand and use. This simplicity reduces the learning curve and enhances productivity, especially when working with HashiCorp’s broader ecosystem like Terraform and Vault.
2. Single Binary
Nomad’s architecture as a single binary makes it remarkably simple to deploy and manage. With no external dependencies or complex setup, Nomad can be easily installed and run on any environment, from local development to large-scale production. This single binary handles all core functions—scheduling, orchestration, and resource management—without needing multiple components or services.
Its simplicity reduces operational overhead, speeds up installation, and enables quick portability between on-premises and cloud environments, making Nomad an efficient and user-friendly solution for managing workloads at any scale.
3. Fit in HashiCorp’s Ecosystem
Nomad’s seamless integrations with other HashiCorp products, like Vault, Consul, and Terraform, make it a powerful part of a unified infrastructure ecosystem. With these integrations, Nomad enhances security, networking, and provisioning workflows. Vault provides dynamic secrets management, ensuring sensitive data remains secure, while Consul offers service discovery and networking automation. Terraform simplifies infrastructure provisioning, allowing teams to define and deploy infrastructure as well as Nomad con. These integrations streamline operations, increase efficiency, and create a cohesive, end-to-end solution for managing complex infrastructure environments.
Nomad vs. Kubernetes: Is It Time to Make the Switch?
While Kubernetes has long been the gold standard for container orchestration, it’s not without its downsides—especially for teams looking for a more straightforward way to manage their platform infrastructure. Nomad’s lightweight architecture and simplicity make it an excellent alternative for those who want to minimize complexity while still scaling effectively.
In this session, you’ll learn whether Nomad is the right fit for your organization and how you can start using it to build scalable, self-hosted platforms.
Conclusion: Bridging the Gap with Nomad

Kubernetes will likely remain a dominant force in the infrastructure space, but for those looking for an alternative that offers ease of use without sacrificing scalability, Nomad is a strong contender. With its ability to run various workloads, integrate with HashiCorp’s suite of tools, and scale efficiently, Nomad provides a simpler solution to managing self-hosted platform infrastructure.
If you’re ready to take your infrastructure to the next level while reducing operational complexity, be sure to attend “A Beginner’s Journey: Scaling Self-Hosted Platform Infrastructure with Nomad” at HashiConf 2024. Whether you’re new to Nomad or just looking for a more streamlined solution, this session will equip you with the knowledge and tools to make scaling your infrastructure more manageable.
Why Attend This Session at HashiConf 2024?
Here are just a few reasons why you shouldn’t miss Ben’s session “A Beginner’s Journey: Scaling Self-Hosted Platform Infrastructure with Nomad” at HashiConf 2024:
- Actionable Insights: Learn how to practically implement Nomad to simplify your platform infrastructure, with real-world examples and best practices.
- Hands-On Learning: Understand how to integrate Nomad with tools you’re already using, such as Terraform, Packer, and HCP, and see how it all fits together in a cohesive workflow.
- Community Engagement: Connect with other engineers and developers who are tackling similar challenges, and share experiences on simplifying infrastructure management.
- Expert Guidance: Whether you’re new to Nomad or already familiar with HashiCorp tools, this session offers valuable insights on how to scale your infrastructure in a way that’s approachable and efficient.
Who Should Attend?
This session is designed for both beginners and experienced practitioners who are looking for alternatives to Kubernetes or simply want to learn more about the capabilities of Nomad. Whether you’re part of an engineering team responsible for CI/CD pipelines, a platform engineer managing infrastructure deployments, or a cloud architect looking for a simpler way to orchestrate workloads, this session will offer valuable insights and practical guidance. Need help with Nomad or any of the HashiCorp suite of products? Contact RPT today, as the leading HashiCorp experts, we can help.
###
PANEL DATE & TIME:
Date: October 15, 2024
Time: 4:15 PM – 4:45 PM ET
Location: Momentum Ballroom D, HashiConf 2024, Boston
By: Ben Lykins, RPT Solutions Architect
Introduction
The following will walk through the necessary steps to deploy NueVector via Helm. This can be done locally or on a virtual machine. I am using minikube to test on, but K3S/MicroK8s or any other distros will work. Since this is going to be scaled down, we will also limit replicas. The purpose of this guide is for testing and not intended for any production usage. Consult the official documentation for more information : SUSE NeuVector Docs.
What is SUSE NeuVector?
SUSE NeuVector, the leader in Full Lifecycle Container Security, delivers uncompromising end-to-end security for modern container infrastructures. SUSE NeuVector offers a cloud-native Kubernetes security platform with end-to-end vulnerability management, automated CI/CD pipeline security, and complete run-time security, including the industry’s only container firewall to block zero days and other threats.
What is Multipass?
Multipass is a tool to generate cloud-style Ubuntu VMs quickly on Linux, macOS, and Windows.It gives you a simple but powerful CLI that allows you to quickly access an Ubuntu command line or create your own local mini-cloud. Developers can use Multipass to prototype cloud deployments and to create fresh, customized Linux dev environments on any machine. Mac and Windows users can use Multipass as the quickest way to get an Ubuntu command line on their system. New Ubuntu users can use it as a sandbox to try new things without affecting their host machine, and without the need to dual boot.
Prerequisites
Required:
- A local or virtual machine with a K8S distro for testing.
- I will use
multipass, which can launch an instance with minikube already installed.
- I will use
Set up Virtual Machine
Since I have multipass installed, I will launch a new vm using the existing minikube image.
Run:
multipass launch -c 8 -m 16G -n demo minikubeOnce completed, you should get a launched.
multipass launch -c 8 -m 16G -n demo minikube
Launched: demo
Running a multipass list, will output all the launched virtual machines.
demo                    Running           192.168.64.20    Ubuntu 22.04 LTS
                                          172.17.0.1
                                          192.168.49.1
NeuVector Setup
Connect to the virtual machine, you will run multipass shell demo.
Following is an example when you shell into the VM:
Welcome to Ubuntu 22.04.3 LTS (GNU/Linux 5.15.0-92-generic aarch64)

 * Documentation:  https://help.ubuntu.com
 * Management:     https://landscape.canonical.com
 * Support:        https://ubuntu.com/pro

  System information as of Thu Feb 29 09:16:40 EST 2024

  System load:                      1.5546875
  Usage of /:                       13.2% of 38.59GB
  Memory usage:                     6%
  Swap usage:                       0%
  Processes:                        199
  Users logged in:                  0
  IPv4 address for br-1746f5f95e03: 192.168.49.1
  IPv4 address for docker0:         172.17.0.1
  IPv4 address for enp0s1:          192.168.64.20
  IPv6 address for enp0s1:          fd3c:28b:5cc5:4064:5054:ff:fe87:5be
NeuVector Setup – minikube
minikube is already started on the new instance; however, I am going to bump up CPUs and Memory for it.
If needing to install minikube, check out the documentation.
First, stop minikube:
Run:
minikube stop
Example Output:
ubuntu@demo:~$ minikube stop
✋  Stopping node "minikube"  ...
????  Powering off "minikube" via SSH ...
????  1 node stopped.
Update CPUs:
Run:
minikube config set cpus 4
Example Output:
ubuntu@demo:~$ minikube config set cpus 4
❗  These changes will take effect upon a minikube delete and then a minikube start
Update Memory:
Run:
minikube config set memory 8192
Example Output:
ubuntu@demo:~$ minikube config set memory 8192
❗  These changes will take effect upon a minikube delete and then a minikube start
Delete exiting minikube:
In order for the configuration changes to be made, minikube needs to be deleted and recreated.
Run:
minikube delete
Example Output:
ubuntu@demo:~$ minikube delete
????  Deleting "minikube" in docker ...
????  Deleting container "minikube" ...
????  Removing /home/ubuntu/.minikube/machines/minikube ...
????  Removed all traces of the "minikube" cluster.
Run:
minikube start
Example Output:
ubuntu@demo:~$ minikube start
????  minikube v1.32.0 on Ubuntu 22.04 (arm64)
✨  Automatically selected the docker driver. Other choices: ssh, none
????  Using Docker driver with root privileges
????  Starting control plane node minikube in cluster minikube
????  Pulling base image ...
????  Creating docker container (CPUs=4, Memory=8192MB) ...
????  Preparing Kubernetes v1.28.3 on Docker 24.0.7 ...
    ▪ Generating certificates and keys ...
    ▪ Booting up control plane ...
    ▪ Configuring RBAC rules ...
????  Configuring bridge CNI (Container Networking Interface) ...
    ▪ Using image gcr.io/k8s-minikube/storage-provisioner:v5
????  Verifying Kubernetes components...
????  Enabled addons: storage-provisioner, default-storageclass
????  Done! kubectl is now configured to use "minikube" cluster and "default" namespace by default
minikube should be up running, once connected. Check its status by doing the following.
Run:
minikube status
Example Output:
ubuntu@demo:~$ minikube status
minikube
type: Control Plane
host: Running
kubelet: Running
apiserver: Running
kubeconfig: Configured
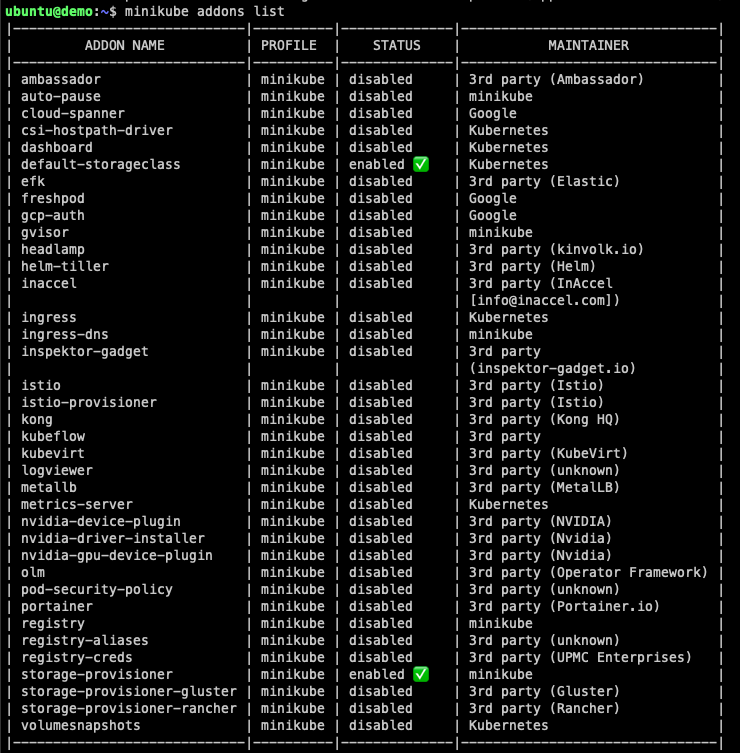
If looking to play with minikube more, there are additional add-ons which can be installed, in this case, we will leave the defaults, but metrics-server and dashboard are typical.
NeuVector Setup – kubectl
This image also comes with kubectl setup:
ubuntu@demo:~$ kubectl version
Client Version: v1.28.7
Kustomize Version: v5.0.4-0.20230601165947-6ce0bf390ce3
Server Version: v1.28.3
NeuVector Setup – helm
Helm is not installed, but can be quickly set up:
ubuntu@demo:~$ helm version
Command 'helm' not found, but can be installed with:
sudo snap install helm
To install, run:
sudo snap install helm --classic
Example Output:
ubuntu@demo:~$ sudo snap install helm --classic
Download snap "core22" (1125) from channel "stable"
Once install is complete, you can check the version with helm version:
ubuntu@demo:~$ helm version
version.BuildInfo{Version:"v3.14.2", GitCommit:"c309b6f0ff63856811846ce18f3bdc93d2b4d54b", GitTreeState:"clean", GoVersion:"go1.21.7"}
NeuVector Setup – Helm Install
Add the helm repo, run:
helm repo add neuvector https://neuvector.github.io/neuvector-helm/For this, I’m going to use the latest version, but other older versions and development version can be listed:
helm search repo neuvector --devel -lWhen this was originally written, the latest as of 29 February 2024 — Leap Day!:
ubuntu@demo:~$ helm search repo neuvector
NAME                CHART VERSION   APP VERSION DESCRIPTION
neuvector/core      2.7.3           5.3.0       Helm chart for NeuVector's core services
neuvector/crd       2.7.3           5.3.0       Helm chart for NeuVector's CRD services
neuvector/monitor   2.7.3           5.3.0       Helm chart for NeuVector monitor services
Helm Install:
For setting up NeuVector, it is simple enough that I will keep most of the default values. I am updating the controller and scanner replicas, if leaving the defaults it will nuke your system since minikube is running a single node. This is fine for local and development environments, run the following:
helm upgrade --install neuvector neuvector/core --version 2.7.6 \
--set tag=5.3.2 \
--set controller.replicas=1 \
--set cve.scanner.replicas=1 \
--create-namespace \
--namespace neuvector
The readme for the repository will provide additional configuration options:
When running:
ubuntu@demo:~$ helm upgrade --install neuvector neuvector/core --version 2.7.6 \
--set tag=5.3.2 \
--set controller.replicas=1 \
--set cve.scanner.replicas=1 \
--create-namespace \
--namespace neuvector
Release "neuvector" does not exist. Installing it now.
NAME: neuvector
LAST DEPLOYED: Thu Feb 29 09:34:30 2024
NAMESPACE: neuvector
STATUS: deployed
REVISION: 1
TEST SUITE: None
NOTES:
Get the NeuVector URL by running these commands:
  NODE_PORT=$(kubectl get --namespace neuvector -o jsonpath="{.spec.ports[0].nodePort}" services neuvector-service-webui)
  NODE_IP=$(kubectl get nodes --namespace neuvector -o jsonpath="{.items[0].status.addresses[0].address}")
  echo https://$NODE_IP:$NODE_PORT
After running helm to install NeuVector, it will take some time for all of the nodes to come up and be stable. When all the pods are up and running and stable, then we should be good to try connecting.
Run:
kubectl get pods -n neuvector
Example Output:
NAME                                        READY   STATUS    RESTARTS      AGE
neuvector-controller-pod-554d868cbd-4sk54   1/1     Running   0             3m15s
neuvector-enforcer-pod-gqhsv                1/1     Running   2 (63s ago)   3m15s
neuvector-manager-pod-8589675984-7pl2j      1/1     Running   0             3m15s
neuvector-scanner-pod-5bb668cc99-r7vkq      1/1     Running   0             3m15
Accessing the NeuVector User Interface
I am going to port-forward this and access it from my local browser. On the virtual machine, run the following command.
kubectl port-forward --address 0.0.0.0 --namespace neuvector service/neuvector-service-webui 8443
Example Output:
ubuntu@demo:~$ kubectl port-forward --address 0.0.0.0 --namespace neuvector service/neuvector-service-webui 8443
Forwarding from 0.0.0.0:8443 -> 8443
This will listen on port 8443 on all addresses (0.0.0.0) and forward to the service : neuvector-service-webui.
Accessing Locally
On you local browser, go to the following, https://ipaddress:8443.
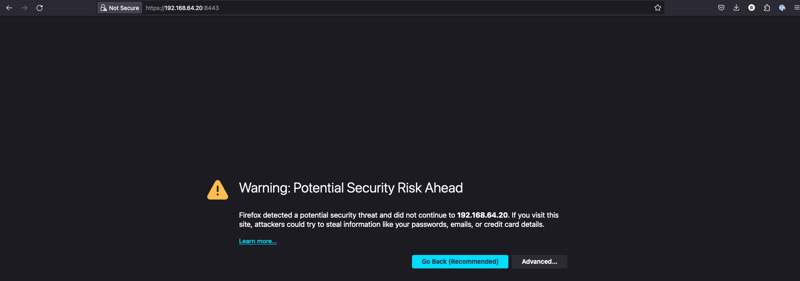
Please Note: the IP Address I pulled is the virtual machine’s private IP address. This can be checked again using
multipass list.
multipass list
Example Output:
Name                    State             IPv4             Image
demo                    Running           192.168.64.20    Ubuntu 24.04 LTS
                                          172.17.0.1
                                          192.168.49.1
Since this is a self-signed certificate, you can ignore the warnings and proceed.
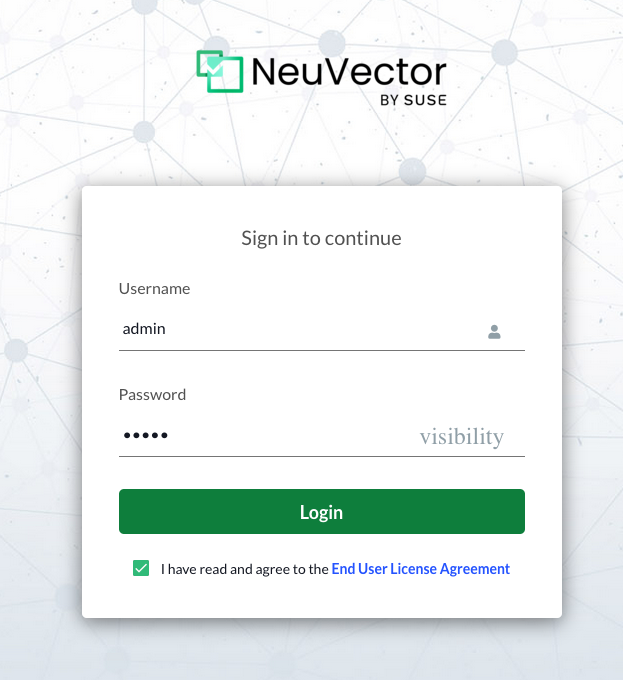
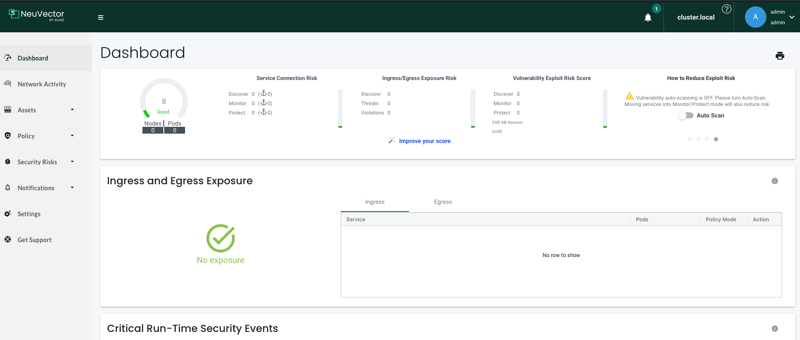
By default, username and password are admin:admin.
Check off on the EULA and you can login.
And voila, update admin password if you plan will continue to use this and you are done.
Additional Steps – Set up mysql container
If looking to test NeuVector a bit more, we will add a MySQL service and run scans on containers and nodes with the NeuVector console.
Add the bitnami repo:
helm repo add bitnami https://charts.bitnami.com/bitnamiInstall:
helm install bitnami/mysql --generate-nameIn NeuVector Interface
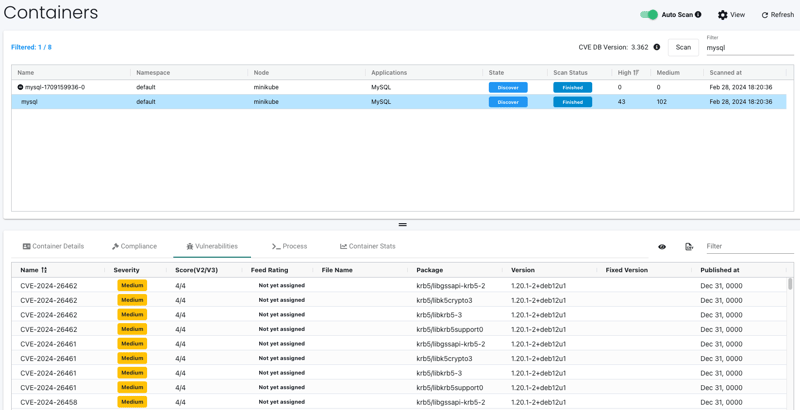
Go to Assets in the navigation pane on the left and select the dropdown. From the dropdown, select containers.
Turn on Auto Scan or perform a manual scan:

Auto Scanning:

Scans will schedule and return back results on completed. Depending on the amount of resources, both scanners and containers, it could take time. Since this is a new cluster, it is relatively quick.

You can filter and view the vulnerabilities which are found:
Go to the Nodes page:

You can see the nodes are also scanned as well for vulnerabilities.
Conclusion
That is about it, a quick and easy way to test out NeuVector. This is really just scratching the surface when it comes to what features and solutions it offers.