Many organizations using the Ansible Automation Platform (AAP) still provision virtual machines manually and then run playbooks afterward. That process often involves waiting for infrastructure tickets, scheduling jobs, and completing lengthy configuration steps. In some cases, it can take hours or even days for a system to be ready for use.
Packer can communicate with both the cloud and the hypervisor, as well as a provisioner, changing the workflow to mint golden images. Deployments begin with a system that is ready in minutes, not days. Although it includes native Ansible support, Enterprise architects often point out problems right away: “You are bypassing all the governance we have built around AAP. No centralized logging, no RBAC, no audit trails, and no consistent execution environments.” For teams that rely on AAP for governance and standardized workflows, local Ansible runs create silos or force duplication. To address this, a custom Packer provisioner was built to integrate directly with the AAP API. Instead of running Ansible locally, Packer now calls job templates from AAP during image builds, enabling organizations to continue using their existing playbooks and environments while benefiting from the speed and repeatability of image factories.
With this approach, image builds run under the same governance as production workloads and benefit from centralized logging, RBAC, and consistent execution environments. Concerns about bypassing controls disappear since all automation stays inside AAP. The result is faster provisioning, reusable images, and an automation workflow that feels both modern and enterprise-ready.
Using the Provisioner
First the plugin will need to be added to the required plugins:
packer {
  required_plugins {
    ansible-aap = {
      source  = "github.com/rptcloud/ansible-aap"
      version = "1.0.0"
    }
  }
}
Then within the build spec, the provisioner can be configured to your AAP instance, assigned a job template ID, and all API orchestration occurs within the code. In a packer template, it would look something like:
build {
  sources = ["source.amazon-ebs.example"]

  provisioner "ansible-aap" {
    tower_host          = "https://aap.example.com"
    access_token        = vault("secret/data/aap", "access_token")
    job_template_id     = 11 # Job template to install docker on host
    organization_id     = 1

    dynamic_inventory   = true

    extra_vars = {
      Name        = "packer-ansible-demo"
      Environment = "production"
      BuiltBy     = "packer"
    }

    timeout       = "15m"
    poll_interval = "10s"
  }
}
amazon-ebs.example: output will be in this color.
==> amazon-ebs.example: Prevalidating any provided VPC information
==> amazon-ebs.example: Prevalidating AMI Name: packer-ansible-demo-20250820181254
...
==> amazon-ebs.example: Waiting for SSH to become available...
==> amazon-ebs.example: Connected to SSH!
==> amazon-ebs.example: Setting a 15m0s timeout for the next provisioner...
amazon-ebs.example: 🌐 Attempting to connect to AAP server: https://aap.example.com
amazon-ebs.example: 🔧 Initializing AAP client...
amazon-ebs.example: ✅ AAP client initialized successfully
amazon-ebs.example: 🎯 Creating inventory for target host: 54.146.55.206
amazon-ebs.example: 🗄️ Using organization ID: 1
amazon-ebs.example: ✅ Created inventory with ID: 75
amazon-ebs.example: ✅ Created SSH credential ID: 63
amazon-ebs.example: 🖥️ Adding host 54.146.55.206 to inventory
amazon-ebs.example: ✅ Added host ID: 66
amazon-ebs.example: 🚀 Launching job template ID 10 for target_host=54.146.55.206
amazon-ebs.example: ✅ Job launched https://aap.example.com/execution/jobs/playbook/142/output/. Waiting for completion...
amazon-ebs.example: ⏳ Polling job status...
amazon-ebs.example: 🎉 Job completed successfully!
amazon-ebs.example: Identity added: /runner/artifacts/142/ssh_key_data (packer-aap-key)
amazon-ebs.example:
amazon-ebs.example: PLAY [Install Docker] **********************************************************
amazon-ebs.example:
amazon-ebs.example: TASK [Gathering Facts] *********************************************************
amazon-ebs.example: [WARNING]: Platform linux on host 54.146.55.206 is using the discovered Python
amazon-ebs.example: interpreter at /usr/bin/python3.7, but future installation of another Python
amazon-ebs.example: interpreter could change the meaning of that path. See
amazon-ebs.example: https://docs.ansible.com/ansible-
amazon-ebs.example: core/2.16/reference_appendices/interpreter_discovery.html for more information.
amazon-ebs.example: ok: [54.146.55.206]
amazon-ebs.example:
amazon-ebs.example: TASK [Update package cache] ****************************************************
amazon-ebs.example: ok: [54.146.55.206]
amazon-ebs.example:
amazon-ebs.example: TASK [Install Docker] **********************************************************
amazon-ebs.example: changed: [54.146.55.206]
amazon-ebs.example:
amazon-ebs.example: TASK [Start and enable Docker service] *****************************************
amazon-ebs.example: changed: [54.146.55.206]
amazon-ebs.example:
amazon-ebs.example: TASK [Add ec2-user to docker group] ********************************************
amazon-ebs.example: changed: [54.146.55.206]
amazon-ebs.example:
amazon-ebs.example: PLAY RECAP *********************************************************************
amazon-ebs.example: 54.146.55.206 : ok=5 changed=3 unreachable=0 failed=0 skipped=0 rescued=0 ignored=0
amazon-ebs.example: 🧹 Cleaning up credential 63...
amazon-ebs.example: 🧹 Cleaning up host 66...
amazon-ebs.example: 🧹 Cleaning up inventory 75...
==> amazon-ebs.example: Stopping the source instance...
...
Build 'amazon-ebs.example' finished after 4 minutes 45 seconds.
==> Wait completed after 4 minutes 45 seconds
==> Builds finished. The artifacts of successful builds are:
--> amazon-ebs.example: AMIs were created:
us-east-1: ami-0d056993e3e2be56fHow the Plugin Integration Works
AAP has a well-documented REST API. The provisioner handles the entire lifecycle through API calls. Here’s the workflow:
sequenceDiagram
    participant P as Packer
    participant Prov as AAP Provisioner
    participant AAP as Ansible Automation Platform
    participant VM as Target VM
    P->>Prov: Start provisioning
    Prov->>AAP: Create temporary inventory
    AAP-->>Prov: Inventory ID: 123
    Prov->>AAP: Register target host
    AAP-->>Prov: Host ID: 456
    Prov->>AAP: Create SSH/WinRM credential
    AAP-->>Prov: Credential ID: 789
    Prov->>AAP: Launch job template
    AAP-->>Prov: Job ID: 1001
    loop Poll Status
        Prov->>AAP: Check job status
        AAP-->>Prov: Status: running/successful/failed
    end
    AAP->>VM: Execute playbooks
    VM-->>AAP: Configuration complete
    Prov->>AAP: Delete credential
    Prov->>AAP: Delete host
    Prov->>AAP: Delete inventory
    Prov-->>P: Provisioning complete
1. Dynamic Inventory Creation
First, we create a temporary inventory in AAP. Every build receives its temporary inventory with a timestamp, ensuring no conflicts or stepping on other builds, providing clean isolation.
curl -X POST https://aap.example.com/api/controller/v2/inventories/ \
  -H "Authorization: Bearer $AAP_TOKEN" \
  -H "Content-Type: application/json" \
  -d '{
    "name": "packer-inv-1642684800",
    "description": "Temporary inventory for packer provisioning",
    "organization": 1
  }'
Response:
{
  "id": 123,
  "name": "packer-inv-1642684800",
  "organization": 1,
  "created": "2025-01-20T10:00:00Z"
}
2. Host Registration
Next, we register the target host that Packer is building. In the provisioner, we retrieve all connection details directly from Packer’s communicator. SSH keys, passwords, WinRM creds, whatever Packer is using to talk to the instance:
curl -X POST https://aap.example.com/api/controller/v2/hosts/ \
  -H "Authorization: Bearer $AAP_TOKEN" \
  -H "Content-Type: application/json" \
  -d '{
    "name": "10.0.1.100",
    "inventory": 123,
    "variables": "{\"ansible_host\": \"10.0.1.100\", \"ansible_port\": 22, \"ansible_user\": \"ec2-user\"}"
  }'
Response:
{
  "id": 456,
  "name": "10.0.1.100",
  "inventory": 123,
  "variables": "{\"ansible_host\": \"10.0.1.100\", \"ansible_port\": 22, \"ansible_user\": \"ec2-user\"}"
}
3. Dynamic Credential Management
Each build has the option to use a temporary credential provided to AAP; this refers to SSH key or username/password authentication.
curl -X POST https://aap.example.com/api/controller/v2/credentials/ \
  -H "Authorization: Bearer $AAP_TOKEN" \
  -H "Content-Type: application/json" \
  -d '{
    "name": "packer-ssh-cred-1642684800",
    "description": "SSH credential for Packer builds",
    "credential_type": 1,
    "organization": 1,
    "inputs": {
      "username": "ec2-user",
      "ssh_key_data": "-----BEGIN PRIVATE KEY-----\nMIIEvgIBADANBgkqhkiG9w0BAQEFAASCBKgwggSkAgEAAoIBAQC..."
    }
  }'
Response:
{
  "id": 789,
  "name": "packer-ssh-cred-1642684800",
  "credential_type": 1,
  "organization": 1
}
4. Job Orchestration
Finally, we launch the actual job template. For this integration to work properly, your job template in AAP needs to be configured to accept runtime parameters:
{
  "name": "Packer Image Build Template",
  "ask_inventory_on_launch": true,
  "ask_credential_on_launch": true,
  "ask_variables_on_launch": true
}
The ask_inventory_on_launch and ask_credential_on_launch settings are crucial – they allow the provisioner to inject the temporary inventory and credentials at launch time instead of using pre-configured values. Without these settings, the job template would try to use its default inventory and credentials, which won’t have access to your Packer-managed instance.
Here’s the launch request:
curl -X POST https://aap.example.com/api/controller/v2/job_templates/42/launch/ \
  -H "Authorization: Bearer $AAP_TOKEN" \
  -H "Content-Type: application/json" \
  -d '{
    "inventory": 123,
    "credentials": [789],
    "extra_vars": {
      "environment": "production",
      "packer_build_name": "amazon-linux-base",
      "packer_build_id": "build-1642684800"
    }
  }'
Response:
{
  "job": 1001,
  "ignored_fields": {},
  "id": 1001,
  "type": "job",
  "url": "/api/controller/v2/jobs/1001/",
  "status": "pending"
}
Then we poll the job status until completion:
curl -X GET https://aap.example.com/api/controller/v2/jobs/1001/ \
  -H "Authorization: Bearer $AAP_TOKEN"
Response when complete:
{
  "id": 1001,
  "status": "successful",
  "finished": "2025-01-20T10:15:30Z",
  "elapsed": 330.5
}
Automated Resource Lifecycle Management
One of the more critical steps is to ensure that temporary resources are cleaned up. Nothing worse than finding 500 orphaned inventories in AAP because builds crashed. The provisioner is coded to track and clean up in a dependency-safe cleanup process:
# Delete credential first
curl -X DELETE https://aap.example.com/api/controller/v2/credentials/789/ \
  -H "Authorization: Bearer $AAP_TOKEN"

# Then delete the host (depends on credential being removed)
curl -X DELETE https://aap.example.com/api/controller/v2/hosts/456/ \
  -H "Authorization: Bearer $AAP_TOKEN"

# Finally delete the inventory (depends on hosts being removed)
curl -X DELETE https://aap.example.com/api/controller/v2/inventories/123/ \
  -H "Authorization: Bearer $AAP_TOKEN"
Get Started
Ready to integrate your Packer workflows with AAP? The provisioner is open source and available on GitHub. Check out the repository for installation instructions, configuration examples, and contribution guidelines:
rptcloud/packer-plugin-ansible-aap
If you’re using this provisioner in your environment or have ideas for improvements, contributions and feedback are welcome!
For organizations leveraging Kubernetes and Rancher, efficient secret management across multiple clusters is a common concern. This blog post uses SUSE’s Fleet to explore a custom operator solution that streamlines secret distribution in multi-cluster environments.
The Challenge of Multi-Cluster Secret Management
As organizations scale Kubernetes infrastructure, managing secrets across multiple clusters becomes increasingly complex. While it’s possible to configure each downstream cluster to communicate directly with a central secret store like HashiCorp Vault, this approach can become unwieldy as the number of clusters grows. Using the Kubernetes JWT authentication method with Vault requires careful management of roles and policies for each cluster. Alternatively, using the AppRole authentication method, while more straightforward to set up, falls short of providing the needed level of security.
Leveraging Rancher as a Central Secrets Manager
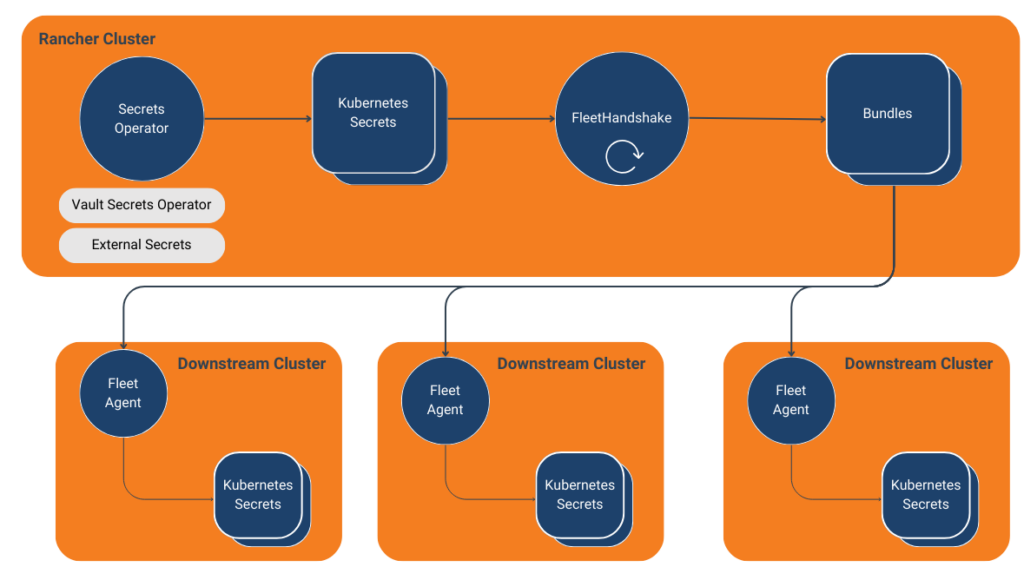
Clusters managed by Rancher leverage the Fleet agent for various aspects of configuration. Using a custom operator, we can enable replication of secrets in targeted Rancher managed clusters. This accounts for secrets created manually in the Rancher cluster or externally managed secrets from tools like HashiCorp Vault or External Secrets.
Introducing the Fleet Handshake Operator
We’ve developed a customer Kubernetes operator that works with Fleet to distribute secrets across clusters. This operator, the Fleet Handshake Operator, listens for defined Kubernetes secrets and creates Fleet Bundles to distribute to downstream clusters.
Fleet Handshake utilizes the cluster hosting the Fleet controller, typically deployed within Rancher, as the central source of truth for secrets. Fleet agents then consume these secrets in downstream clusters. This approach solves the “secret zero” problem by leveraging Rancher as the JWT authentication to Vault and Fleet to manage the connectivity to downstream clusters. Moreover, it provides a centralized point of control for secret distribution while maintaining security.
Advantages of This Approach
- Automation: The operator automates the process of secret distribution, reducing manual intervention and potential errors.
- Scalability: Adding new clusters is as simple as updating the FleetHandshake resource with new targets or tagging the resource with the appropriate targeted label selector.
- Consistency: Ensures that secrets are consistently distributed across all specified clusters.
- Leverage Existing Infrastructure: Utilizes Rancher’s Fleet for secret distribution, using its secure communication channels with downstream clusters.
- Flexibility: Works with Kubernetes secrets regardless of source, allowing integration with various secret management tools and workflows.
Technical Implementation
The Fleet Handshake Operator is built around a custom resource definition (CRD) called FleetHandshake. This CRD defines the structure for specifying which secrets should be synchronized and to which target clusters. The main controller, FleetHandshakeReconciler, handles the reconciliation loop for these custom resources. When a secret is created or updated, the reconciler, which listens for the changes, will then update the Bundle resource it manages to distribute downstream.
Let’s dive into the critical components of the operator:
Reconciliation Process
The Reconcile function implements the operator’s core logic. It first gets the secret resource and the custom FleetHandshake. It then upserts the bundle attribute. If all is successful, it updates the fleet handshake to synced.
func (r *FleetHandshakeReconciler) Reconcile(ctx context.Context, req ctrl.Request) (ctrl.Result, error) {
    // Fetch the FleetHandshake resource
    var fleetHandshake rancherv1.FleetHandshake
    if err := r.Get(ctx, req.NamespacedName, &fleetHandshake); err != nil {
        // Handle error or return if not found
    }

    // Retrieve the target secret
    var secret corev1.Secret
    if err := r.Get(ctx, types.NamespacedName{Namespace: fleetHandshake.Namespace, Name: fleetHandshake.Spec.SecretName}, &secret); err != nil {
        // Handle error or return if not found. if not found, a status of mising will be set
    }

    // Check to see if a fleet bundle exists
    var existingBundle fleetv1alpha1api.Bundle
    err := r.Get(ctx, types.NamespacedName{Name: bundle.Name, Namespace: bundle.Namespace}, existingBundle)
    if err != nil && errors.IsNotFound(err) {
       // Update existing Bundle if content has changed
         if !reflect.DeepEqual(existingBundle.Spec, bundle.Spec) {
            if err := r.Update(ctx, bundle); err != nil {
                // Handle bundle error
            }
        }
    } else {
        if err := r.Create(ctx, bundle); err != nil {
                // Handle bundle error
            }
        }
    }

   fleetHandshake.Status.Status = "Synced"
    if err := r.Status().Update(ctx, &fleetHandshake); err != nil {
        // Handle error
    }

    return ctrl.Result{}, nil
}
A Bundle–a resource housing the secret’s content–is distributed by Fleet to the respective targets. The owner reference plays a significant role here, tying the bundle to the fleet handshake resource. This synchronization ensures that the lifecycles align seamlessly, enhancing the efficiency of the process. Importantly, deleting the handshake prompts the Kubernetes API to remove the secrets downstream.
bundle := &fleetv1alpha1api.Bundle{
    ObjectMeta: metav1.ObjectMeta{
        Name:      fleetHandshake.Name,
        Namespace: fleetHandshake.Namespace,
        OwnerReferences: []metav1.OwnerReference{{
            APIVersion: fleetHandshake.APIVersion,
            Kind:       fleetHandshake.Kind,
            Name:       fleetHandshake.Name,
            UID:        fleetHandshake.UID,
        }},
    },
    Spec: fleetv1alpha1api.BundleSpec{
        Resources: []fleetv1alpha1api.BundleResource{
            {
                Name:    fmt.Sprintf("%s.json", secret.Name),
                Content: string(jsonSecret),
            },
        },
        Targets: fleetHandshake.Spec.Targets,
    },
}
Conclusion
The Fleet Handshake Operator provides a powerful solution for organizations seeking to streamline their secret management across multiple Kubernetes clusters. By leveraging Suse’s Fleet and implementing a custom operator, we can achieve a scalable, secure, and automated approach to secret distribution. This implementation serves as a testament to the pivotal role custom operators play in extending and enhancing the capabilities of existing Kubernetes ecosystem tools, providing tailored solutions for complex operational challenges. As Kubernetes environments become complex, the role of such custom operators in maintaining operational efficiency and security becomes increasingly significant.
To explore this solution and install it within your rancher instance, visit our GitHub repository at https://github.com/rptcloud/fleet-handshake, or checkout our visual walkthrough of the Fleet Handshake Operator’s capabilities.

About River Point Technology: River Point Technology (RPT) is an award-winning cloud consulting, training, and enablement provider, partnering with the Fortune 500 to accelerate their digital transformation and infrastructure automation journeys and redefine the art of the possible. Our world-class team of IT, cloud, and DevOps experts helps organizations leverage the cloud for transformative growth through prescriptive methodologies, best- in-class services, and our trademarked Value Creation Technology process. From consulting and training to comprehensive year-long RPT Accelerator programs, River Point Technology empowers enterprises to achieve Day 2 success in the cloud and maximize their technology investments.