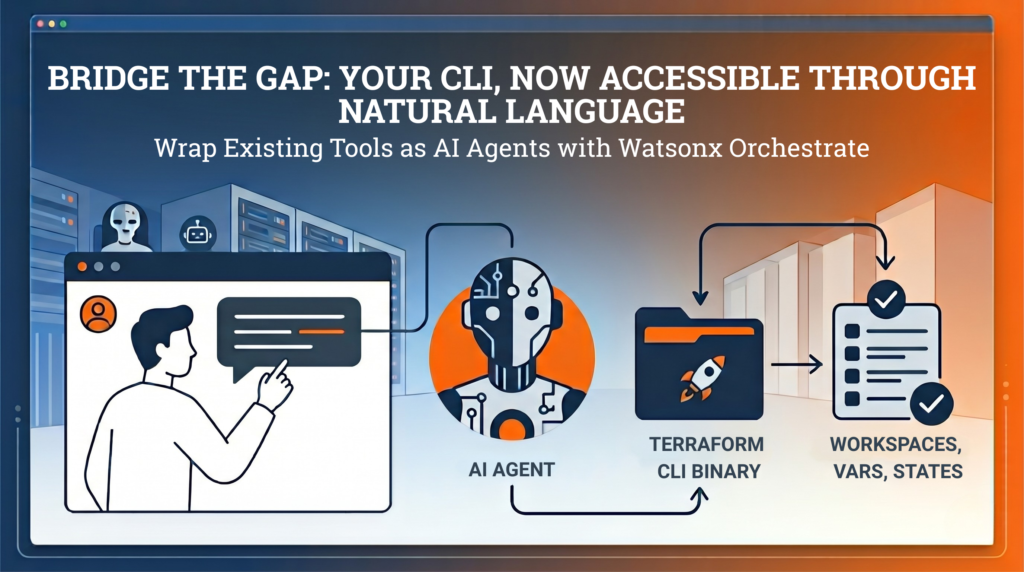
Many infrastructure teams rely on powerful CLI tools. However these tools are often limited to experts who already understand the commands and workflows. At scale this creates a gap between capability and accessibility.
IBM Watsonx Orchestrate lets you build AI agents that can call tools through natural language. Instead of rewriting those tools, you can wrap your existing binaries as Python tools and expose them directly to Watsonx.
User -> Watsonx Agent -> Python Tool (@tool) -> CLI Binary -> Output -> Agent -> UserThe Problem
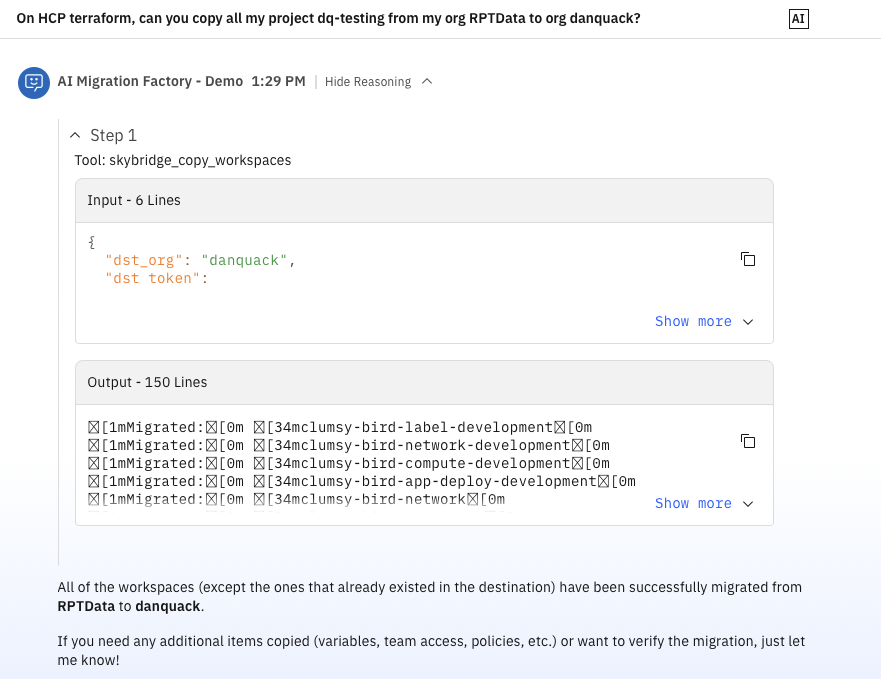
At River Point Technology, we have migrated many Terraform Enterprise organizations to HCP Terraform, spanning more than 1,500 workspaces. Our solutions architects have developed a custom CLI to handle complex migration steps with copying workspaces, variables, state files, teams, and policy sets between organizations. The CLI works well, but it assumes command-line fluency. We wanted the same migration engine available through a guided, conversational workflow so more teams could run tasks safely.
How Watsonx Tools Work
Watsonx tools are Python functions decorated with @tool from the ibm_watsonx_orchestrate SDK. Tool functions are a thin wrapper that takes agent-supplied parameters, maps them to your binary’s flags and environment variables, executes the command with subprocess, and returns output for the agent to summarize. The agent reads the function and docstring to understand what the tool does and when to call it. To deploy a tool, package your Python file, dependencies, and (in our case) the compiled binary, then upload everything with the orchestrate CLI.
Prerequisites
Before you start, make sure you have:
- Python tool code using the ibm-watsonx-orchestrate SDK
- A Linux build of your binary (watsonx sandbox runtime is Linux)
- orchestrate CLI access configured for your Watsonx tenant
Writing a Tool That Wraps a Binary
Here is a trimmed-down version of our skill. The full file has 25 tools covering the list, copy, lock, unlock, validate, and core migration commands.
import os

import stat

import subprocess

from pathlib import Path

from ibm_watsonx_orchestrate.agent_builder.tools import tool

BINARY = Path(__file__).parent / "skybridge"

def run(args: list[str]) -> str:

    BINARY.chmod(BINARY.stat().st_mode | stat.S_IEXEC | stat.S_IXGRP | stat.S_IXOTH)

    result = subprocess.run(

        [str(BINARY), "--json", *args],

        capture_output=True,

        text=True,

        env=os.environ.copy(),

    )

    if result.returncode != 0:

        return f"[exit {result.returncode}]\nSTDOUT: {result.stdout}\nSTDERR: {result.stderr}"

    return result.stdout or result.stderr

@tool

def skybridge_copy_workspaces(

    src_token: str,

    dst_token: str,

    src_org: str,

    dst_org: str,

    src_hostname: str = "app.terraform.io",

    dst_hostname: str = "app.terraform.io",

    dst_project_id: str = "",

    workspaces: str = "*",

) -> str:

    """Execute skybridge to copy workspaces from the source org to the

    destination org and return the results immediately.

    Pass workspaces as a comma-separated list of names (e.g. 'ws1,ws2,ws3') or leave as '*' to copy all workspaces."""

    workspace_args = ["--workspaces", workspaces] if workspaces and workspaces != "*" else []

    return run(["copy", "workspaces", *workspace_args])
A few patterns matter in production:
- Co-locate the binary. We compile Skybridge for Linux (because Watsonx sandbox runs Linux) and place it in the same package directory.
- Docstrings are part of your API contract. Watsonx reads docstrings to decide when and how to call tools, so be explicit about required inputs, expected format, and side effects.
- Sandbox resource limits. Long-running operations and large state transfers can hit execution timeouts. We have seen this in high-volume state copy scenarios. We solved this by splitting operations into smaller batches and allowing the LLM to execute these through agent instructions.
Building and Deploying
Deployment is two steps. First, compile the binary for Linux (the Watsonx sandbox target).
GOOS=linux GOARCH=amd64 go build -ldflags="-s -w" -o watson_skill/skybridge_package/skybridge .
Then upload the tool to Watsonx:
orchestrate tools import -k python \

  -f watson_skill/skybridge_package/skybridge_skill.py \

  -r watson_skill/requirements.txt \

  -p watson_skill/skybridge_package
The flags break down as follows:
- -k python tells Watsonx this is a Python tool
- -f points to the skill file containing @tool functions
- -r points to your requirements file (ours just has ibm-watsonx-orchestrate)
- -p points to the package directory, including the compiled binary
After import completes, the tools are available to any configured agent. Watsonx picks up function signatures, docstrings, and parameter types automatically. You do not need to redesign your system to get value from AI agents. In many cases, a thin wrapper plus a well-defined interface is enough.
Using It
Once deployed, you can ask:
- “List all workspaces in the acme-prod org.”
- “Copy workspaces ws-api and ws-frontend from old-org to new-org.”
The agent chooses the right tool, asks for missing parameters, and runs the command.
Security Considerations
When you expose infrastructure operations through AI tools, guardrails matter:
- Use short-lived credentials and least-privilege scopes. For more secure connections, consider using orchestrate connections.
- Redact sensitive values from stdout/stderr before returning output
- Keep destructive operations explicit in docstrings (“This action modifies…”)
- Add approval gates for high-impact operations.
For organizations leveraging Kubernetes and Rancher, efficient secret management across multiple clusters is a common concern. This blog post uses SUSE’s Fleet to explore a custom operator solution that streamlines secret distribution in multi-cluster environments.
The Challenge of Multi-Cluster Secret Management
As organizations scale Kubernetes infrastructure, managing secrets across multiple clusters becomes increasingly complex. While it’s possible to configure each downstream cluster to communicate directly with a central secret store like HashiCorp Vault, this approach can become unwieldy as the number of clusters grows. Using the Kubernetes JWT authentication method with Vault requires careful management of roles and policies for each cluster. Alternatively, using the AppRole authentication method, while more straightforward to set up, falls short of providing the needed level of security.
Leveraging Rancher as a Central Secrets Manager
Clusters managed by Rancher leverage the Fleet agent for various aspects of configuration. Using a custom operator, we can enable replication of secrets in targeted Rancher managed clusters. This accounts for secrets created manually in the Rancher cluster or externally managed secrets from tools like HashiCorp Vault or External Secrets.
Introducing the Fleet Handshake Operator
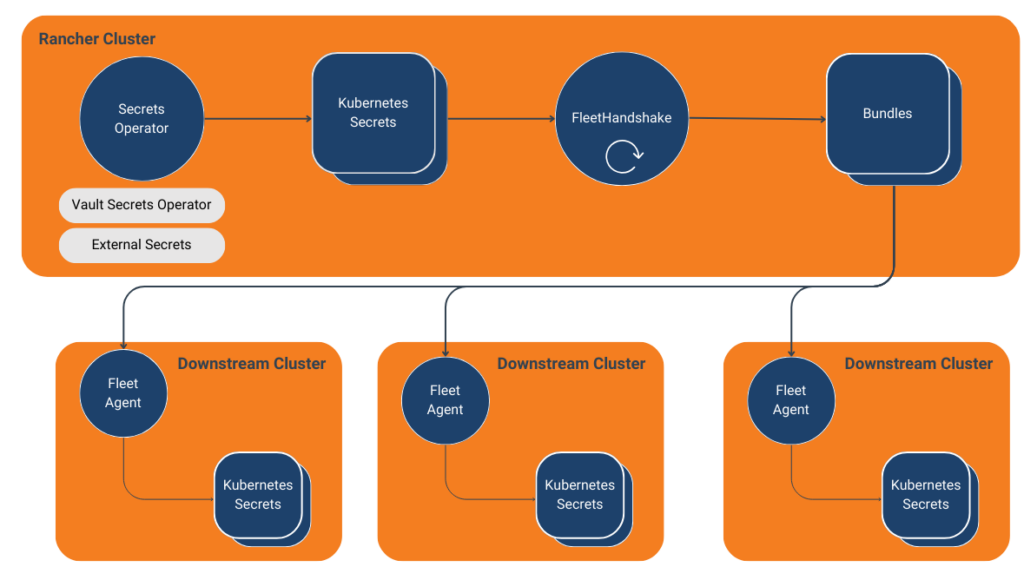
We’ve developed a customer Kubernetes operator that works with Fleet to distribute secrets across clusters. This operator, the Fleet Handshake Operator, listens for defined Kubernetes secrets and creates Fleet Bundles to distribute to downstream clusters.
Fleet Handshake utilizes the cluster hosting the Fleet controller, typically deployed within Rancher, as the central source of truth for secrets. Fleet agents then consume these secrets in downstream clusters. This approach solves the “secret zero” problem by leveraging Rancher as the JWT authentication to Vault and Fleet to manage the connectivity to downstream clusters. Moreover, it provides a centralized point of control for secret distribution while maintaining security.
Advantages of This Approach
- Automation: The operator automates the process of secret distribution, reducing manual intervention and potential errors.
- Scalability: Adding new clusters is as simple as updating the FleetHandshake resource with new targets or tagging the resource with the appropriate targeted label selector.
- Consistency: Ensures that secrets are consistently distributed across all specified clusters.
- Leverage Existing Infrastructure: Utilizes Rancher’s Fleet for secret distribution, using its secure communication channels with downstream clusters.
- Flexibility: Works with Kubernetes secrets regardless of source, allowing integration with various secret management tools and workflows.
Technical Implementation
The Fleet Handshake Operator is built around a custom resource definition (CRD) called FleetHandshake. This CRD defines the structure for specifying which secrets should be synchronized and to which target clusters. The main controller, FleetHandshakeReconciler, handles the reconciliation loop for these custom resources. When a secret is created or updated, the reconciler, which listens for the changes, will then update the Bundle resource it manages to distribute downstream.
Let’s dive into the critical components of the operator:
Reconciliation Process
The Reconcile function implements the operator’s core logic. It first gets the secret resource and the custom FleetHandshake. It then upserts the bundle attribute. If all is successful, it updates the fleet handshake to synced.
func (r *FleetHandshakeReconciler) Reconcile(ctx context.Context, req ctrl.Request) (ctrl.Result, error) {
    // Fetch the FleetHandshake resource
    var fleetHandshake rancherv1.FleetHandshake
    if err := r.Get(ctx, req.NamespacedName, &fleetHandshake); err != nil {
        // Handle error or return if not found
    }

    // Retrieve the target secret
    var secret corev1.Secret
    if err := r.Get(ctx, types.NamespacedName{Namespace: fleetHandshake.Namespace, Name: fleetHandshake.Spec.SecretName}, &secret); err != nil {
        // Handle error or return if not found. if not found, a status of mising will be set
    }

    // Check to see if a fleet bundle exists
    var existingBundle fleetv1alpha1api.Bundle
    err := r.Get(ctx, types.NamespacedName{Name: bundle.Name, Namespace: bundle.Namespace}, existingBundle)
    if err != nil && errors.IsNotFound(err) {
       // Update existing Bundle if content has changed
         if !reflect.DeepEqual(existingBundle.Spec, bundle.Spec) {
            if err := r.Update(ctx, bundle); err != nil {
                // Handle bundle error
            }
        }
    } else {
        if err := r.Create(ctx, bundle); err != nil {
                // Handle bundle error
            }
        }
    }

   fleetHandshake.Status.Status = "Synced"
    if err := r.Status().Update(ctx, &fleetHandshake); err != nil {
        // Handle error
    }

    return ctrl.Result{}, nil
}
A Bundle–a resource housing the secret’s content–is distributed by Fleet to the respective targets. The owner reference plays a significant role here, tying the bundle to the fleet handshake resource. This synchronization ensures that the lifecycles align seamlessly, enhancing the efficiency of the process. Importantly, deleting the handshake prompts the Kubernetes API to remove the secrets downstream.
bundle := &fleetv1alpha1api.Bundle{
    ObjectMeta: metav1.ObjectMeta{
        Name:      fleetHandshake.Name,
        Namespace: fleetHandshake.Namespace,
        OwnerReferences: []metav1.OwnerReference{{
            APIVersion: fleetHandshake.APIVersion,
            Kind:       fleetHandshake.Kind,
            Name:       fleetHandshake.Name,
            UID:        fleetHandshake.UID,
        }},
    },
    Spec: fleetv1alpha1api.BundleSpec{
        Resources: []fleetv1alpha1api.BundleResource{
            {
                Name:    fmt.Sprintf("%s.json", secret.Name),
                Content: string(jsonSecret),
            },
        },
        Targets: fleetHandshake.Spec.Targets,
    },
}
Conclusion
The Fleet Handshake Operator provides a powerful solution for organizations seeking to streamline their secret management across multiple Kubernetes clusters. By leveraging Suse’s Fleet and implementing a custom operator, we can achieve a scalable, secure, and automated approach to secret distribution. This implementation serves as a testament to the pivotal role custom operators play in extending and enhancing the capabilities of existing Kubernetes ecosystem tools, providing tailored solutions for complex operational challenges. As Kubernetes environments become complex, the role of such custom operators in maintaining operational efficiency and security becomes increasingly significant.
To explore this solution and install it within your rancher instance, visit our GitHub repository at https://github.com/rptcloud/fleet-handshake, or checkout our visual walkthrough of the Fleet Handshake Operator’s capabilities.
About River Point Technology: River Point Technology (RPT) is an award-winning cloud consulting, training, and enablement provider, partnering with the Fortune 500 to accelerate their digital transformation and infrastructure automation journeys and redefine the art of the possible. Our world-class team of IT, cloud, and DevOps experts helps organizations leverage the cloud for transformative growth through prescriptive methodologies, best- in-class services, and our trademarked Value Creation Technology process. From consulting and training to comprehensive year-long RPT Accelerator programs, River Point Technology empowers enterprises to achieve Day 2 success in the cloud and maximize their technology investments.
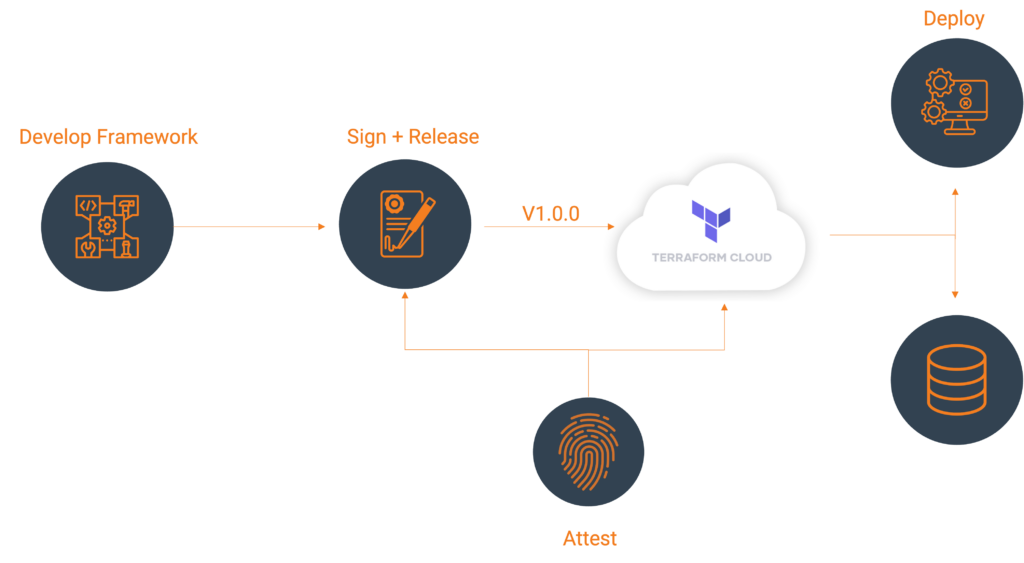
HashiCorp’s Terraform Cloud provides a centralized platform for managing infrastructure as code. It’s a leading provider in remote Terraform management with remote state management, automated VCS integrations, and cost visibility. One of its features, a private registry, can be used to develop internal Terraform providers where control, security, and customizations are paramount.
Let’s explore an example using the Terraform Provider Scaffolding Framework to build a custom Terraform provider and publish it to a private registry. Scaffold provides a framework starter kit that you can use out of the box to replace your APIs.
Signing Your Provider
Code signing guarantees that the generated artifacts originate from your source, allowing users to verify this authenticity by comparing the produced signature with your publicly available signing key. It will require you to generate a key pair through the GNU PGP utility. You can develop this by using the command below, be sure to replace GPG_PASSWORD and your name with values that make sense.
gpg --default-new-key-algo rsa4096 --batch --passphrase "${GPG_PASSWORD}" --quick-gen-key 'Your Name <[email protected]>' default defaultExport Public Key
With your newly generated key securely stored, the next step involves exporting and uploading it to Terraform Cloud. This action facilitates verification while deploying your signed artifacts, and ensuring their authenticity within the platform’s environment. The GPG Key API requires the public key to validate the signature. To access the list of key IDs, you can execute: gpg --list-secret-keys --keyid-format LONG. The key is denoted in the output.
[keyboxd]
---------
sec   rsa4096/<KEY ID> 2023-11-22 [SC] [expires: 2026-11-21]
You can then get your public key as a single string. KEY=$(gpg --armor --export ${KEY_ID} | awk '{printf "%sn", $0}'). You’ll then need to build a payload with the output of that file and POST that to https://app.terraform.io/api/registry/private/v2/gpg-keys. The ORG_NAME is your Terraform cloud organization.
{
  "data": {
        "type": "gpg-keys",
        "attributes": {
            "namespace": "${ORG_NAME}",
            "ascii-armor": "${KEY}"
        }
    }
}
Export Private Key for CI/CD (Optional)
If you plan to use this key in a CI Platform, you can also export the key and upload it gpg --export-secret-keys --armor ${KEY_ID} > /tmp/gpg.pgp to a secure Vault.
Packaging Terraform Providers with GoReleaser
GoReleaser simplifies the process of building and releasing Go binaries. Using GoReleaser, we can bundle different architectures, operating systems, etc.
You will need to create a terraform registry manifest, the protocol version is essential. If you are using Plugin Framework, you will want version 6.0. If you are using Plugin SDKv2, you will want version 5.0.
{
    "version": 1,
    "metadata": {
      "protocol_versions": ["6.0"]
    }
}
Configuring GoReleaser
Ensure your goreleaser.yml configuration includes settings for multi-architecture support and signing. This file should live at the provider’s root, next to your main codebase.
before:
  hooks:
    - go mod tidy
builds:
- env:
    - CGO_ENABLED=0
  mod_timestamp: '{{ .CommitTimestamp }}'
  flags:
    - -trimpath
  ldflags:
    - '-s -w -X main.version={{ .Version }} -X main.commit={{ .Commit }}'
  goos:
    - freebsd
    - windows
    - linux
    - darwin
  goarch:
    - amd64
    - '386'
    - arm
    - arm64
  ignore:
    - goos: darwin
      goarch: '386'
  binary: '{{ .ProjectName }}_v{{ .Version }}'
archives:
- format: zip
  name_template: '{{ .ProjectName }}_{{ .Version }}_{{ .Os }}_{{ .Arch }}'
checksum:
  extra_files:
    - glob: 'terraform-registry-manifest.json'
      name_template: '{{ .ProjectName }}_{{ .Version }}_manifest.json'
  name_template: '{{ .ProjectName }}_{{ .Version }}_SHA256SUMS'
  algorithm: sha256
signs:
  - artifacts: checksum
    args:
      - "--batch"
      - "--local-user"
      - "{{ .Env.GPG_FINGERPRINT }}"
      - "--output"
      - "${signature}"
      - "--detach-sign"
      - "${artifact}"
    stdin: '{{ .Env.GPG_PASSWORD }}'
release:
  extra_files:
    - glob: 'terraform-registry-manifest.json'
      name_template: '{{ .ProjectName }}_{{ .Version }}_manifest.json'
changelog:
  skip: true
Tag your Branch
git tag 0.0.1
git checkout 0.0.1
Your git strategy may differ, but GoReleaser uses branch tags to determine versions.
Bundle and Sign Binaries
Execute GoReleaser to bundle the binaries locally without publishing. We skipped publishing as we will manually upload them to Terraform Cloud.
export GPG_TTY=$(tty)
export GPG_FINGERPRINT=${KEY_ID}
goreleaser release --skip=publish
Now we have our artifacts.
Publishing to Terraform Cloud Private Registry
Once you have the signed binaries, you can publish them to the Terraform Cloud private registry. HashiCorp provides a guide, which we will follow.
Register the provider (first time only)
Create a provider config file and POST that body utilizing your Terraform Cloud API token. A provider name is usually a singular descriptor representing a business unit, such as Google or AWS.
curl --header "Authorization: Bearer ${TERRAFORM_CLOUD_API_TOKEN}"
--header "Content-Type: application/vnd.api+json"
--request POST
-d @-
"https://app.terraform.io/api/v2/organizations/${ORG_NAME}/registry-providers" <<EOT

{
  "data": {
    "type": "registry-providers",
    "attributes": {
      "name": "${PROVIDER_NAME}",
      "namespace": "${ORG_NAME}",
      "registry-name": "private"
    }
  }
}
EOT
Uploading your Versions
Create Version Shell within Private Registry Providers
curl -H "Authorization: Bearer ${TOKEN}"
  -H "Content-Type: application/vnd.api+json"
 --request POST
  -d @-
"https://app.terraform.io/api/v2/organizations/${ORG_NAME}/registry-providers/private/${ORG_NAME}/${PROVIDER_NAME}/versions" <<EOT

{
  "data": {
    "type": "registry-provider-versions",
    "attributes": {
      "version": "${VERSION}",
      "key-id": "${KEY_ID}",
      "protocols": ["6.0"]
    }
  }
}
EOT
The response will contain upload links that you will use to upload the SHA256SUMS and SHA256.sig files.
"links": {
    "shasums-upload": "https://archivist.terraform.io/v1/object/dmF1b64hd73ghd63",
    "shasums-sig-upload": "https://archivist.terraform.io/v1/object/dmF1b37dj37dh33d"
 }
Upload Signatures.
# Replace ${VERSION} and ${PROVIDER_NAME} with actual values
curl -sS -T "dist/terraform-provider-${PROVIDER_NAME}_${VERSION}_SHA256SUMS" "${SHASUM_UPLOAD}"
curl -sS -T "dist/terraform-provider-${PROVIDER_NAME}_${VERSION}_SHA256SUMS.sig" "${SHASUM_SIG_UPLOAD}"
Register Platform for every Architecture and Operating System.
FILENAME="terraform-provider-${PROVIDER_NAME}_${VERSION}_${OS}_${ARCH}.zip"
SHA=$(shasum -a 256 "dist/${FILENAME}" | awk '{print $1}' )
# OS ex. darwin/linux/windows# ARCH ex. arm/amd64# FILENAME. terraform-provider-<PROVIDER_NAME>_<VERSION>_<OS>_<ARCH>.zip. Define through name_template

curl -H "Authorization: Bearer ${TOKEN}"
 -H "Content-Type: application/vnd.api+json"
 --request POST
 -d @-
  "https://app.terraform.io/api/v2/organizations/${ORG_NAME}/registry-providers/private/${ORG_NAME}/${PROVIDER_NAME}/versions/${VERSION}/platforms" << EOT
  {
    "data": {
        "type": "registry-provider-version-platforms",
        "attributes": {
            "shasum": "${SHA}",
            "os": "${OS}",
            "arch": "${ARCH}",
            "filename": "${FILENAME}"
        }
    }
}
EOT
The response will contain upload the provider binary to:
"links": {
  "provider-binary-upload": "https://archivist.terraform.io/v1/object/dmF1b45c367djh45nj78"
}
Upload archived binaries
curl -sS -T "dist/${FILENAME}" "${PROVIDER_BINARY_URL}"Repeat step: Register Platform for every Architecture and Operating System and step: Upload Archived Binaries for every architecture and operating system.
Using the provider
Private providers hosted within Terraform Cloud are only available to users within the organization.

When developing locally, ensure you set up credentials through the terraform login, creating a credentials.tfrc.json file.
With the authentication bits setup, you can utilize the new provider by defining the provider block substituting in those existing variables.
terraform {
  required_providers {
    ${PROVIDER_NAME} = {
      source = "app.terraform.io/${ORG_NAME}/${PROVIDER_NAME}"
      version = "${VERSION}"
    }
  }
}

provider "${PROVIDER_NAME}" {
  # Configuration options
}
Document Provider
For user consumption, a common practice is to provide provider documentation for your resources utilizing Terraform plugin docs. This plugin generator allows you to generate markdowns from examples and schema definitions, which users can then consume. At the time of publication, this feature is currently not supported within the Terraform Cloud. Please talk to your River Point Technology representative for alternative solutions.
Cleanup
To remove the provider from the registry:
Delete version
curl -H "Authorization: Bearer ${TOKEN}"
 --request DELETE
  "https://app.terraform.io/api/v2/organizations/${ORG_NAME}/registry-providers/private/${ORG_NAME}/${PROVIDER_NAME}/versions/${VERSION}"
Delete provider
curl -H "Authorization: Bearer ${TOKEN}"
 --request DELETE
  "https://app.terraform.io/api/v2/organizations/${ORG_NAME}/registry-providers/private/${ORG_NAME}/${PROVIDER_NAME}"
Deregister GPG Key
curl -H "Authorization: Bearer ${TOKEN}"
 --request DELETE
https://app.terraform.io/api/registry/private/v2/gpg-keys/${ORG_NAME}/${KEY_ID}
Conclusion
With a private registry, you get all the benefits of Terraform while still allowing internal consumption. This may be desirable when public providers don’t meet your use case and it comes with a host of benefits:
- More Customization and Control: A private registry allows organizations to maintain control over their proprietary or custom-built Terraform providers. It enables them to manage, version, and distribute these providers securely within the organization.
- Better Security and Compliance: A private registry ensures that only authorized users within the organization can access and utilize specific Terraform providers for sensitive or proprietary infrastructure configurations. This control aids in compliance with internal policies and regulatory requirements.
- Improved Versioning and Stability: With a private registry, teams can maintain a stable versioning system for their Terraform providers. This helps ensure project infrastructure configurations remain consistent and compatible with the specified provider versions.
Publishing custom Terraform providers to the Terraform Cloud private registry involves bundling, signing, and uploading binaries and metadata through the API. Following these steps, you can effectively manage and distribute your Terraform provider to support various architectures and operating systems.
River Point Technology (RPT) is here to guide you through the intricacies of exploring the dynamic cloud landscape. If you’re facing challenges and need assistance in achieving increased customization and oversight, enhanced security and compliance, along with improved versioning and stability, feel free to leave a comment or reach out to us directly.
As the HashiCorp Global Competency Partner of the Year and the only company certified in all three competencies—Security, Networking, and Infrastructure—we stand out as a market leader. Trusted by Fortune 500 companies, we serve as their guide in effectively navigating the dynamic cloud terrain. Contact RPT for guidance in optimizing the journey through the cloud landscape.